
When it comes to DIY roof repairs, knowing the do’s and don’ts can make all the difference. You need to assess the damage carefully and understand your roof type before getting started. Using the right tools is vital, but so is prioritizing safety. However, jumping into complex repairs without the right skills can lead to bigger problems. Let’s explore the essential steps you should take to guarantee your roof repairs are successful and safe.
Key Takeaways
- Do assess the roof type and damage severity before starting repairs to prioritize issues effectively.
- Don’t attempt repairs in adverse weather conditions or without proper safety gear to avoid accidents.
- Do use the correct materials and tools specific to your roof type for effective repairs.
- Don’t overlook the need for permits, as failing to obtain them can lead to fines and complications.
- Do schedule regular inspections and preventive maintenance to catch issues early and extend roof lifespan.
Assessing Damage Before You Start DIY Roof Repairs
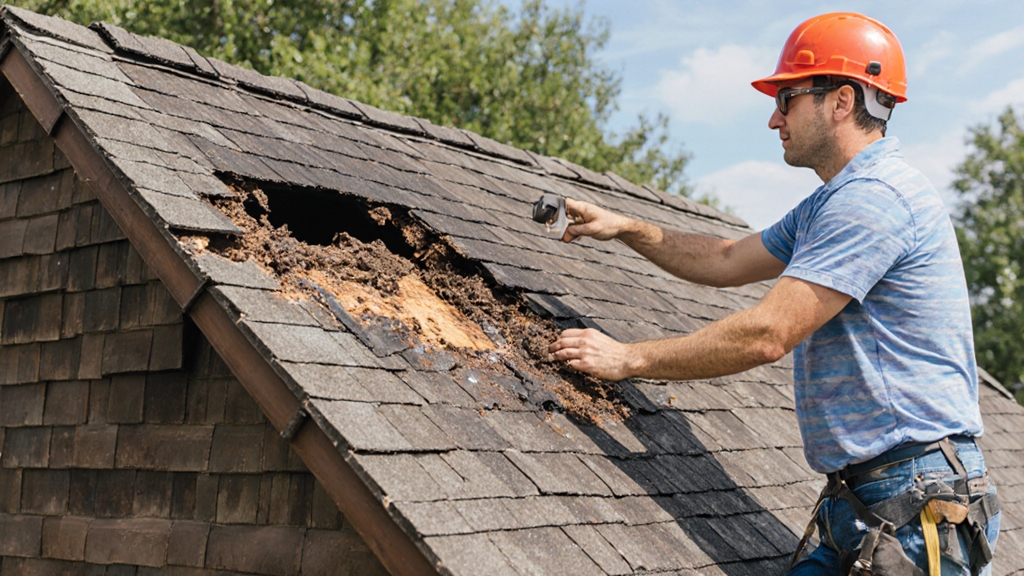
Before diving into DIY roof repairs, it’s crucial to assess the damage thoroughly. Start by inspecting your roof from the ground and then, if safe, climb up for a closer look. Look for missing shingles, leaks, or signs of rot. Document everything you find—this damage assessment will guide your repair priorities.
Once you’ve identified the issues, prioritize them based on severity. For instance, a leak that’s causing water damage should take precedence over minor shingle damage. Don’t rush; take your time to make sure you understand the extent of the repairs needed.
Consider the weather conditions, as working on a wet or windy day can complicate your repairs. Properly planning your approach won’t only enhance your safety but also guarantee your repairs are effective.
Understanding Your Roof Type and Materials
Knowing your roof type and materials is essential for effective repairs, as each type has its unique characteristics and requirements. For instance, asphalt shingles are popular for their affordability and ease of installation, while metal roofs offer durability and longevity. Understanding these roof types helps you determine the right approach when conducting repairs.
Material differences also play a significant role in your repair strategy. If you have a tile roof, you’ll need to be cautious about breaking tiles during the repair process, while flat roofs require different sealing methods compared to sloped roofs.
Before diving into repairs, take a close look at your roof’s structure and materials. This knowledge not only guides your repair methods but also guarantees you’re using the correct materials to match your roof type.
Ultimately, knowing what you’re working with can save you time and money in the long run.
Essential Tools for DIY Roof Repairs
When tackling DIY roof repairs, having the right tools at your disposal can make all the difference in the success of your project.
To effectively work with roofing materials and apply various repair techniques, you’ll want to gather these essential tools:
- Safety Gear: Don’t skip on a sturdy helmet, gloves, and non-slip shoes to protect yourself while working at heights.
- Roofing Nail Gun: This tool speeds up the process of securing roofing materials, ensuring they stay in place during repairs.
- Utility Knife: A sharp utility knife is vital for cutting roofing materials accurately, allowing for clean edges and proper fitting.
With these tools, you’ll be well-equipped to tackle your roof repairs efficiently and safely, ensuring your home remains protected from the elements.
Top Safety Precautions for DIY Roof Repairs
As you commence DIY roof repairs, prioritizing safety is crucial to protect yourself from potential hazards. Start by wearing proper safety gear, including a hard hat, non-slip shoes, and gloves to safeguard against falls and cuts.
Always inspect your ladder for stability before use; it should be on level ground and extend at least three feet above the roof edge for added safety. When climbing, maintain three points of contact—two hands and one foot or two feet and one hand—on the ladder at all times.
Consider using a safety harness to prevent falls, especially if your roof is steep. Confirm your workspace is clear of debris and tools to avoid tripping hazards.
Finally, don’t attempt repairs during adverse weather conditions. By adhering to these roof safety precautions, you can minimize risks and focus on effectively completing your repair project.
Step-by-Step DIY Roof Repair Techniques
Successfully repairing your roof can be broken down into five essential steps.
First, gather your materials and tools, ensuring you have the right roofing materials for your specific repair.
Next, inspect the area closely to identify the damage—this helps you choose the most effective repair techniques.
Here are three key steps to follow:
- Prepare the Surface: Clear debris and loose shingles from the damaged area.
- Apply Roofing Materials: Use appropriate patching material or shingles, following the manufacturer’s instructions for installation.
- Seal and Finish: Once the materials are in place, apply roofing sealant to secure everything and prevent leaks.
When to Call a Professional Roofer?
Sometimes, your roof can show signs of severe damage that are beyond your skill level.
If you’re facing complex repair challenges or feel uncertain about the extent of the issues, it’s best to call a professional roofer.
They’ve the expertise to handle tough situations safely and effectively.
Signs of Severe Damage
When you notice water stains on your ceiling or find shingles missing after a storm, it’s crucial to assess the situation promptly.
Ignoring these signs can lead to severe issues, like leaking roofs and mold growth. Here are three key signs that indicate it’s time to call a professional roofer:
- Shingle Deterioration: If your shingles are curling or cracking, your roof’s integrity is compromised.
- Structural Weaknesses: Sagging areas in your roof can signal significant hidden damage.
- Flashing Issues: Damaged or missing flashing can lead to serious water infiltration.
If you spot any of these problems, don’t hesitate to reach out to an expert.
They can address insulation problems and prevent pest infestations before they escalate.
Complex Repair Challenges
Although you might feel tempted to tackle every roof repair yourself, some challenges are best left to professionals. Complex issues can arise, requiring specialized knowledge in roofing materials and repair techniques. If you encounter any of the following situations, it’s time to call a pro:
| Situation | Why It’s Complex | Professional Help Needed |
| Severe Leaks | Water damage can worsen quickly | Expertise in waterproofing |
| Structural Damage | Compromises roof integrity | Assessment of underlying issues |
| Multiple Layers of Shingles | Confusion over what to replace | Knowledge of proper layering |
| Unusual Roof Designs | Unique materials and construction | Specialized repair techniques |
| Safety Concerns | Risk of falls or injury | Use of safety equipment |
Don’t hesitate—calling a professional can save you time, money, and frustration!
What You Need to Know About Local Building Codes
Before you start your DIY roof repairs, it’s essential to understand your local building codes.
These regulations can vary greatly, so make sure to check what’s required in your area and obtain any necessary permits.
Consulting with building professionals can also help you stay compliant and avoid costly mistakes.
Understand Local Regulations
Understanding local regulations is essential for any DIY roof repair project. Before you start, familiarize yourself with the applicable local ordinances and zoning laws. These rules can vary considerably based on your location and can impact your project.
Here are three key points to take into account:
- Check Local Building Codes: Verify your repairs comply with safety standards and construction practices.
- Consult Zoning Laws: Know any restrictions or requirements related to your property’s usage and modifications.
- Review Homeowners Association Rules: If you live in an HOA, they may have specific guidelines regarding roofing materials and designs.
Obtain Necessary Permits
Have you considered the importance of obtaining the necessary permits before starting your roof repairs? A permit application is often required by local regulations to guarantee your work meets safety and building standards.
Skipping this step can lead to fines, delays, or even having to redo your work. Before you grab your tools, check with your local building department to understand which permits you need for your specific project.
They’ll provide guidance on the application process and any inspections that may be required. Remember, adhering to local regulations not only keeps you compliant but also protects your investment in your home.
Consult Building Professionals
Obtaining permits is just the first step in your DIY roof repair journey; consulting building professionals about local building codes is equally important.
Understanding these codes guarantees your project meets safety standards and prevents future issues. Here are some consultation benefits you should consider:
- Expert Guidance: Professionals provide insights that can save you time and money, helping you avoid costly mistakes.
- Compliance Assurance: They’ll verify your project adheres to local regulations, protecting you from fines or legal troubles.
- Quality Control: Professional advice can enhance the durability of your repairs, ensuring they stand the test of time.
Don’t skip this vital step; investing in professional consultation can make all the difference in your DIY roof repair project.
Tips for Preventing Future Roof Problems
While roof repairs can be challenging, taking proactive steps now can help you avoid costly issues down the line. Start by implementing a routine of preventive maintenance.
Regularly check your roof for any signs of damage, like missing shingles or cracked flashing. Schedule seasonal inspections, ideally before winter and after storms, to catch potential problems early. Clean your gutters and downspouts to guarantee proper water drainage, as clogs can lead to water pooling and leaks.
Additionally, keep an eye on the trees around your home. Trim any overhanging branches to prevent them from damaging your roof during storms.
If you notice any signs of moisture or mold in your attic, address them quickly to prevent further issues. By staying vigilant and proactive, you’ll extend the life of your roof and save yourself from unexpected repairs.
Budgeting for Your DIY Roof Repairs
When planning your DIY roof repairs, you’ll want to start by estimating the material costs involved.
Don’t forget to factor in any labor expenses if you’re hiring help or if you think you might need extra hands.
A solid budget guarantees you’re prepared for the entire project without any surprises.
Estimate Material Costs
Before you plunge into your DIY roof repairs, it’s important to estimate your material costs to avoid unexpected expenses.
Start by doing a material price comparison among various roofing supply sources. This way, you can find the best deals for your project.
Here are three key items to keep in mind when estimating your costs:
- Roofing Materials: Shingles, underlayment, and flashing are vital components.
- Tools and Equipment: Make sure you account for ladders, safety gear, and any specialized tools.
- Additional Supplies: Don’t forget nails, caulk, and sealants, as they can add up quickly.
Factor In Labor Expenses
Estimating material costs sets the stage for your DIY roof repairs, but don’t overlook the impact of labor expenses on your budget.
Even if you plan to tackle the project yourself, there might be times when hiring help becomes necessary. Consider the labor costs involved if you need assistance or if the work exceeds your skill level. Research local rates for contractors or handymen, as these can vary greatly.
Factor in these potential expenses when creating your budget to avoid surprises down the line. If you can manage the entire project solo, great!
Just remember, it’s smart to account for any unexpected costs that might arise during your DIY roof repairs. Planning ahead will save you headaches later.
Inspecting Your Work: Ensuring Quality After Repairs
After completing your roof repairs, it’s vital to thoroughly inspect your work to confirm everything is secure and functioning properly.
Conducting a quality assessment will help you catch any issues before they become bigger problems. Use a repair checklist to make sure you don’t miss any important steps.
- Check for Leaks: Inspect the repaired area during a rainstorm or use a hose to simulate rain, confirming no water seeps through.
- Inspect Flashing: Make sure all flashing is properly sealed and overlaps are secure to prevent water intrusion.
- Examine Shingles: Look for loose, damaged, or misaligned shingles, and verify they’re all securely attached.
Frequently Asked Questions
How Long Will My DIY Roof Repair Last?
Your DIY roof repair’s longevity largely depends on the material quality you choose. If you use high-quality materials and follow best practices, you can expect your repair to last several years, possibly even decades.
Can I Use Leftover Materials From Previous Repairs?
Yes, you can use leftover materials, but make certain they’re compatible with your current roofing. Proper material compatibility can greatly impact repair longevity, so check for any signs of wear or damage before proceeding.
What Are Common Mistakes to Avoid in DIY Roofing?
You should avoid improper sealing and inadequate ventilation when DIY roofing. These mistakes can lead to leaks and mold growth. Always guarantee proper installation and airflow to protect your roof and home from future damage.
How Do Weather Conditions Affect My Repair Timeline?
Weather patterns can greatly affect your repair timeline. If it’s rainy or windy, you might need to delay repairs, increasing repair urgency. Always check forecasts beforehand to plan effectively and guarantee a successful repair.
Will My Homeowner’s Insurance Cover DIY Repairs?
Your homeowner’s insurance might cover DIY repairs, but it depends on your insurance policies. Keep thorough repair documentation, as it can help you file a claim if needed and guarantee you receive proper coverage.
Final Thoughts
DIY roof repairs can absolutely save you money and give you a real sense of accomplishment—but only when you know your limits. Always start by carefully assessing the damage, using the right tools, and putting safety first. Some minor fixes are manageable for confident homeowners, but more complex issues can quickly turn into bigger, more expensive problems if not handled correctly.
If you’re unsure about the severity of the damage, don’t risk your safety or your home. The roofing professionals at Roofing Sterling Heights MI are here to help with everything from detailed roof inspections to full roof replacements and other roofing services. We proudly serve Sterling Heights and nearby communities, providing expert guidance so you can make the right choice between DIY and professional repair.
If you’ve started a repair and realized it’s more than you bargained for—or you just want a trusted opinion—reach out through our contact page to schedule an inspection or request an estimate. By combining smart DIY decisions with professional support when needed, you’ll keep your roof in top shape, prevent future issues, and protect your home for years to come.