
A roof is a layered system working as structure and weather defense. The deck supports loads. Ice and water shield protects eaves, valleys, and penetrations. Underlayment adds a secondary barrier. Drip edge directs runoff and shields edges. Starter strips anchor the first shingle course. Vapor barriers manage interior moisture. Gutters and downspouts move water away. Fasteners and adhesives secure components and resist uplift. Maintenance pathways and safety features protect access areas. Each layer’s role builds toward a durable, reliable roof—discover how.
Key Takeaways
- Roof deck is the structural base that ties framing together and supports loads; materials include plywood and OSB.
- Drip edge metal directs water into gutters and protects eaves and rakes from rot and wind-driven rain.
- Underlayment and ice/water shield form secondary barriers, sealing nail holes and defending valleys, eaves, and penetrations.
- Flashing at seams, valleys, and penetrations sheds water by layering; sealant is supplementary, not primary waterproofing.
- Shingles and ridge caps provide the primary weather surface, resist wind, and finish the system; ventilation balances moisture and heat.
Roof Deck: The Structural Base
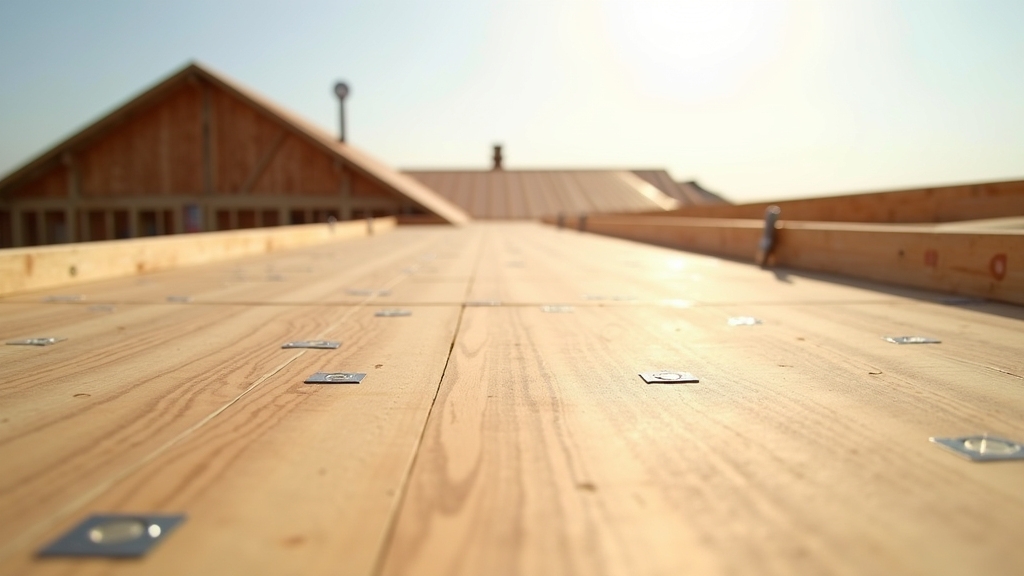
The roof deck forms the structural platform that supports roofing materials and transfers loads to the framing below. It establishes roof strength by tying rafters or trusses together, resisting wind uplift, and spreading live and dead loads uniformly.
The roof deck unites framing, resists uplift, and evenly distributes live and dead loads.
Common installation materials include plywood, oriented strand board (OSB), and, in some historic or specialty applications, plank boards. Thickness selection depends on span, fastener spacing, and local codes, ensuring adequate stiffness and fastener holding power.
Proper fastening with nails or screws, installed to manufacturer patterns, prevents squeaks, uplift, and uneven surfaces. Gaps for expansion, straight seams, and aligned panel edges reduce stress concentrations.
Ventilation clearances at eaves and ridges, along with compatible underlayments, help manage moisture from inside the structure. Accurate cuts around penetrations preserve structural continuity and long-term performance.
Ice and Water Shield: Leak Defense at Vulnerable Areas
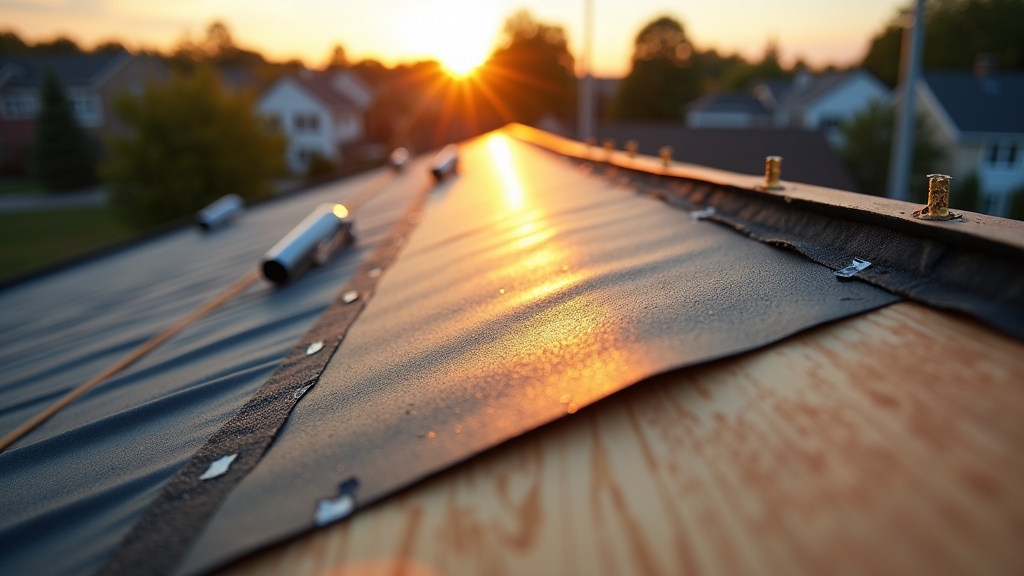
Ice and water shield is placed at high-risk zones such as eaves, valleys, roof penetrations, and along walls.
Its self-sealing, rubberized asphalt adheres to the deck and seals around nail holes to block wind-driven rain and melting ice.
Where It’s Installed
Often positioned as a first line of defense, ice and water shield is installed at high-risk zones where leaks commonly originate.
During roof installation, contractors apply this membrane along eaves to combat ice dams, and extend it up the roof plane to a specified distance past the interior wall line. It is also placed in valleys, where two roof sections meet and channel concentrated runoff.
Around penetrations—chimneys, skylights, plumbing vents—the shield wraps closely to protect cutouts and flashing interfaces. Rakes and low-slope connections receive coverage because wind-driven rain can infiltrate there.
Along step flashing against sidewalls and dormers, it creates a continuous barrier. These placements highlight layer significance: the membrane goes wherever water can linger, collect, or be forced beneath primary roofing.
How It Prevents Leaks
While shingles shed most rain and snow, leak prevention at vulnerable spots relies on a self-sealing membrane that blocks hidden pathways. The ice and water shield adheres tightly to decking and wraps nail shafts, so penetrations do not become conduits. At eaves, valleys, skylights, and chimneys, it forms a continuous gasket that resists wind-driven rain and ice dams. Heat softens its adhesive, letting it flow microscopically into gaps, curbing water damage before it migrates.
| Vulnerable Area | How the Shield Stops Leaks |
| Eaves/ice dams | Seals under shingle edges, blocking backflow from melting ice |
| Valleys | Bridges metal valley seams, preventing capillary intrusion |
| Penetrations | Encapsulates fasteners and flanges, maintaining a watertight bond |
This layered defense supports long-term leak prevention and preserves structural materials.
Underlayment: Secondary Weather Barrier
A quiet shield beneath the shingles, underlayment forms the roof’s secondary weather barrier, protecting sheathing from wind-driven rain, snowmelt, and incidental moisture. It bridges the gap between the roof deck and exterior cladding, offering a consistent layer of defense when shingles lift, age, or shed water unevenly.
Common underlayment types include asphalt-saturated felt, synthetic polypropylene or polyester sheets, and self-adhered rubberized asphalt membranes. Felt offers affordability, synthetics provide higher tear resistance and stability, and self-adhered options seal around nail penetrations and perform well in ice-prone zones.
Sound installation techniques matter: decks must be clean and dry; courses should overlap to shed water; fasteners are placed per manufacturer guidance; and valleys, penetrations, and ridges receive careful detailing. Proper ventilation complements performance by limiting trapped moisture and heat.
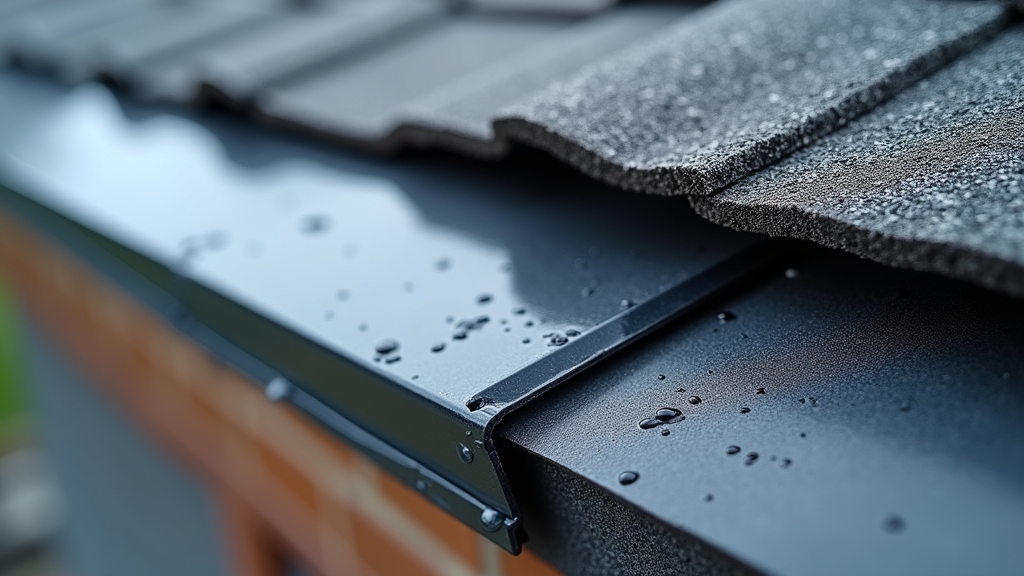
Drip Edge: Protecting Eaves and Rakes
Beneath shingles, underlayment guards the deck; at the roof’s perimeter, the drip edge completes that defense. This L-shaped metal flashing steers water into gutters, shields exposed edges from wind-driven rain, and prevents capillary backup under shingles.
Among drip edge benefits are reduced risk of rot at eaves and rakes, protection of fascia, and improved shingle longevity by controlling runoff.
Sound installation techniques position the flange along eaves first, extending slightly past the fascia with a drip lip to break surface tension. Pieces overlap by at least two inches, fastened with corrosion-resistant nails in a staggered pattern.
Along rakes, the edge typically laps over the eave piece to direct water away from the structure. Proper alignment and straight, continuous runs maintain consistent water shedding.
Starter Strips: The Foundation for Shingle Courses
Starter strips set the edge protection baseline, sealing the roof perimeter against capillary water and shingle blow-offs.
Their proper alignment establishes the reference line for the first course, controlling overhang and consistent exposure.
Adhesive placement and strip orientation are critical to lock tabs and boost wind resistance from the eaves upward.
Edge Protection Basics
Edge protection starts with starter strips, the unsung layer that locks the first course of shingles to the roof edge and defends against wind uplift and water intrusion. In effective edge protection systems, these strips create a sealed, straight baseline that helps prevent capillary wicking and shingle blow‑offs at eaves and rakes. Factory-adhesive edges bond to the underside of the first shingle course, while precise overhang controls drip into the gutter, not behind the fascia. Typical edge protection materials include asphaltic starter rolls, pre-cut shingle starters, and compatible underlayment at the eave.
| Component | Function |
| Starter strip | Bonds first course, seals edge |
| Adhesive line | Resists wind uplift |
| Drip edge metal | Channels water off fascia |
| Underlayment lap | Secondary moisture barrier |
| Fasteners | Secure assembly to deck |
Proper Alignment Methods
With the edge secured by starter strips, the next priority is placing them straight and true so every shingle course tracks correctly. Proper alignment techniques begin with establishing a reference line: installers snap a chalk line parallel to the eave, factoring the shingle exposure and any roof taper.
They verify squareness at rakes using a framing square or 3-4-5 triangle to prevent creeping courses. Alignment tools such as chalk reels, laser lines, and string lines guide consistent placement across the deck.
Starter strips are set to the line, not the deck edge, compensating for waviness in sheathing or fascia. Corners are checked frequently, and measurements are confirmed at intervals to maintain parallelism.
Short test layouts facilitate pattern fit before full installation proceeds.
Adhesion and Wind Resistance
Although alignment sets the path, performance depends on how reliably shingles bond and resist uplift. Starter strips provide a continuous adhesive edge, activating under heat and pressure to lock the first course. Proper adhesion techniques—clean substrates, correct placement, and compatible sealant strips—create a uniform seal that limits entry points for wind. Wind resistance factors include eave exposure, roof pitch, regional gust speeds, and fastener spacing. When these are matched with manufacturer-rated starter strips, the roof’s perimeter resists peel forces and shingle flutter.
| Element | Image Cue |
| Starter strip edge | A straight, sticky runway |
| Heat-activated seal | Sun-warmed glue line gripping |
| Nails at eave | Anchors pinning the seam |
| Overlapping shingle | Scales interlocking tightly |
| Wind flow path | Arrows sliding over edges |
Balanced detailing yields durable adhesion and fewer uplift failures.
Field Shingles: Primary Weather Surface
The field shingles form the roof’s primary weather barrier, shedding water, resisting wind uplift, and protecting underlying layers from ultraviolet exposure. They span the broad planes of the roof, creating a continuous surface that channels runoff toward eaves and gutters.
Performance hinges on two factors: shingle materials and installation techniques. Asphalt, metal, wood, and composite options offer different lifespans, weights, and thermal responses, while proper fastening patterns and staggered layouts limit entry points for water.
- Material selection: Match climate, budget, and desired service life; consider impact ratings and reflectivity.
- Layout and fastening: Maintain correct exposure, nail placement, and course alignment to prevent capillary intrusion and blow-offs.
- Detailing penetrations: Flash chimneys, vents, and skylights carefully, integrating shingles to preserve drainage paths.
Ridge Cap Shingles: Sealing the Peak
Crowning the roof, ridge cap shingles lock the opposing slopes together while sealing the most vulnerable horizontal joint. Their ridge cap functions include shedding wind-driven rain, shielding exposed shingle cut-ends, and resisting uplift where pressures peak.
Properly shaped caps also finish the roof line with a uniform, shadowed profile that discourages water eddies and debris catch.
Uniform, shadowed ridge caps refine the roofline, steering water flow and preventing debris accumulation.
Key installation techniques prioritize alignment, fastening, and ventilation compatibility. Caps are laid perpendicular to the ridge, overlapping with the prevailing wind, and nailed high on the manufacturer’s marks to anchor into the ridge board or decking.
Sealant strips activate with warmth, bonding layers into a continuous shield. On vented ridges, pre-formed caps integrate with the vent product, preserving airflow while maintaining weatherproof coverage across the crest.
Flashing: Seams, Valleys, and Penetration Protection
Flashing forms the waterproof armor where shingles meet seams, valleys, and roof penetrations.
Readers will see how step, valley, apron, counter, and pipe boot flashing each serve distinct junctions.
The section then explains proper installation practices—correct overlaps, fastening, sealant use, and integration with underlayment—to prevent leaks and premature failure.
Types of Roof Flashing
From chimneys to skylights, every break in a roof’s surface demands targeted protection, and that is where roof flashing types come into play. Each profile directs water away from seams, valleys, and penetrations, complementing shingles and underlayment.
Common flashing types vary by location, material, and shape, and their effectiveness depends on fit and compatible installation techniques.
1) Step and counter-flashing: Layered pieces along sidewalls and chimneys that overlap shingles; counter-flashing locks out wind-driven rain and UV exposure at masonry joints.
2) Valley flashing: W-shaped or open valleys that channel concentrated runoff; metals like galvanized steel, aluminum, or copper resist corrosion and debris scouring.
3) Apron, drip edge, and vent flashing: Aprons shield skylight bottoms; drip edges protect eaves and rake edges; boot flashings seal around vents and pipes, preserving watertight continuity.
Proper Flashing Installation
Every successful roofing system depends on flashing that is sized, layered, and fastened to shed water by gravity, not sealant.
Proper flashing installation begins with selecting flashing types compatible with roof pitch, cladding, and climate.
Step flashing is interwoven with shingles at sidewalls; counterflashing laps over base flashing at chimneys; valley metal is centered, hemmed, and held off the deck to guide flow.
Fasteners are placed high and away from water paths, with overlaps facing downhill.
Installation techniques include priming masonry for reglets, bending drip edges with closed hems, and maintaining prescribed exposure lines.
Penetrations receive form-fitted boots or preformed collars, clamped and integrated with underlayment.
Sealant serves only as a supplementary detail; laps, shingle-style sequencing, and mechanical attachment do the work.
Ventilation: Intake and Exhaust for Attic Health
Though often overlooked, balanced attic ventilation—paired intake at the eaves and exhaust at the ridge or gables—governs moisture control, temperature moderation, and roof longevity.
When intake pulls cooler, drier air into soffits and exhaust releases warmer, humid air at high points, attic airflow becomes predictable and steady. Properly sized ventilation systems reduce condensation that can rot sheathing, curb heat buildup that bakes shingles, and help prevent ice-dam conditions by keeping deck temperatures more uniform.
1) Intake matters: continuous soffit vents or spaced vents should be unobstructed by paint, debris, or compressed baffles.
2) Exhaust options: ridge vents offer consistent release; gable or box vents add capacity when geometry limits ridges.
3) Sizing counts: follow net free area ratios and manufacturer guidance to balance intake and exhaust.
Insulation: Thermal Performance and Energy Efficiency
While ventilation manages air movement, insulation governs heat flow, shaping comfort, energy costs, and the roof system’s durability. Its job is to slow heat transfer, keeping winter warmth inside and summer heat out. Effective insulation supports energy conservation by reducing HVAC run time and stabilizing indoor temperatures.
Several insulation types serve roofs and attics: fiberglass batts, blown-in cellulose, mineral wool, and spray foam. Each differs in R-value per inch, air-sealing capability, fire resistance, and installation method. Proper thickness and continuous coverage are critical; gaps, compression, or misalignment with the air barrier erode performance.
Location matters too—roof deck, attic floor, or both—depending on climate and design goals. Code-required R-values provide a baseline, but upgrading often yields better payback through lower utility bills and improved year-round comfort.
Vapor Barrier: Moisture Control From the Inside
A vapor barrier controls interior moisture migration, protecting insulation and roof assemblies from condensation.
Its placement—typically on the warm-in-winter side—depends on climate and assembly design.
Material choices range from polyethylene and kraft-faced batts to smart membranes, each with distinct permeability and performance characteristics.
Purpose and Placement
Because interior humidity inevitably migrates toward colder surfaces, a vapor barrier’s purpose is to slow that diffusion before it reaches and condenses within roof assemblies.
Its placement is typically on the warm-in-winter side of the insulation, where it complements other layer functions without trapping moisture. Positioned correctly, it protects framing, insulation R-value, and interior finishes by directing vapor away from vulnerable roofing materials.
1) Placement principle: Install on the occupied side of insulation in heating-dominant climates; shift toward the interior in mixed zones, always avoiding double barriers.
2) Continuity matters: Seal seams, penetrations, and edges to prevent bypasses that undermine performance.
3) Coordination with assemblies: Align with air control strategies, ventilation paths, and drainage planes so each layer’s functions reinforce the whole roof system.
Material Options and Performance
Selecting a vapor barrier begins with matching material permeance and durability to climate, assembly, and interior conditions.
Polyethylene sheets offer very low permeance and low cost, but limited material durability if exposed to UV or jobsite damage.
Foil-faced kraft papers add radiant control and higher tear resistance, yet require continuous adhesion for reliable results.
Self-adhered membranes provide strong seals around fasteners and seams, improving performance ratings in air and vapor control, though they demand clean substrates.
Smart vapor retarders shift permeance with humidity, protecting in winter while allowing drying in summer—useful in mixed climates.
Liquid-applied air/vapor barriers conform to irregular substrates and simplify detailing but require careful thickness control.
Selection should prioritize tested assemblies, code compliance, and credible third-party performance ratings.
Gutters and Downspouts: Managing Runoff
While shingles and flashing keep water out, gutters and downspouts move it away. This pair channels rainfall from the roof edge to safe discharge points, protecting siding, foundations, and landscaping.
Choosing among gutter types—K-style, half-round, or box—affects capacity, appearance, and debris behavior. Equally important, downspout materials such as aluminum, galvanized steel, copper, and vinyl influence durability, corrosion resistance, and cost.
Correct sizing prevents overflow during peak storms, and proper slope guarantees steady flow to outlets.
1) Select gutter types to match climate and roof area; larger profiles serve steep, expansive roofs better.
2) Match downspout materials to site conditions; coastal air favors corrosion-resistant aluminum or copper.
3) Maintain flow paths: clear debris, verify hangers and outlets, and direct discharge at least several feet from the foundation.
Fasteners and Adhesives: Holding the System Together
Lock, bond, and seal—fasteners and adhesives are the quiet mechanics of a roof, securing layers against wind, gravity, and thermal movement.
Fastener types vary by system: ring-shank nails for asphalt shingles, screws with sealing washers for metal panels, and corrosion-resistant anchors for underlayment over decks. Their placement and penetration depth control uplift resistance and limit substrate damage.
Adhesives complement mechanical hold. Modified bitumen relies on asphalt mastics; single-ply membranes use solvent-based or low-VOC contact cements; foam insulations often receive polyurethane adhesives.
Proper adhesive strength balances peel and shear forces, preventing slippage without telegraphing or bridging. Compatibility matters: chemistry must match membrane and substrate, and temperatures must suit cure times.
Together, correct fastener patterns and calibrated bonding create a continuous, durable assembly.
Maintenance Pathways and Safety Features
Beyond fasteners and adhesives securing the assembly, a roof’s performance depends on how people safely access and service it. Planned maintenance pathways protect membranes, guide traffic, and reduce accidental damage. Designers specify walk pads, ladders, and guardrails where technicians travel, integrating safety protocols without interrupting drainage or thermal performance.
Planned roof pathways safeguard membranes, guide service traffic, and integrate safety without compromising drainage or thermal performance.
Clear routes also minimize punctures around sensitive penetrations and equipment curbs, a central maintenance consideration for long-term reliability.
1) Defined access points: Fixed ladders, hatches, and doors create predictable entry, reducing unplanned foot traffic across vulnerable areas.
2) Walk zones and pads: High-contrast, slip-resistant surfaces indicate routes, disperse loads, and preserve the waterproofing layer during routine inspections.
3) Fall protection systems: Guardrails, parapets, lifelines, and anchors align with current safety protocols, ensuring compliant work practices while maintaining serviceability and inspection efficiency.
Frequently Asked Questions
How Do Roofing Warranties Differ Between Manufacturers and Installers?
They differ in scope, duration, and responsibility. Manufacturer warranties cover material defects, often prorated, with maintenance conditions. Installer warranties cover workmanship, addressing leaks or improper installation. Claims processes, transferability, exclusions, and required documentation vary, so homeowners should compare manufacturer warranties and installer warranties carefully.
What Roof Materials Are Most Solar-Panel Friendly?
Metal standing seam, composite shingle (asphalt), and concrete tile offer strong solar panel compatibility among roofing material types. Flat single-ply membranes (TPO/EPDM) also work well. Slate and cedar shake pose challenges due to fragility, weight, and specialized mounting hardware.
How Do Local Building Codes Affect Roof Layer Choices?
Local building codes define roof layer choices by mandating building regulations, fire ratings, wind uplift resistance, insulation R-values, vapor control, and material specifications. They influence underlayment types, fastener patterns, decking thickness, and compatibility with regional climate and structural loads.
Can a Roof Be Recycled at End of Life?
Yes, a roof can be recycled. Roof recycling depends on material type: metal and slate are highly recyclable; asphalt shingles are processed into pavement; membranes vary. Choosing sustainable materials and deconstruction-friendly fasteners increases recovery rates and reduces landfill waste.
What Are Signs a Roof Suffered Hail Damage?
They identify hail impact by finding circular dents on shingles or metal, bruised granules, soft spots, cracked or torn tabs, exposed matting, punctured vents, chipped paint, and clogged gutters with granules, prompting a professional damage assessment to confirm.
Final Thoughts
From the roof deck to the drip edge, every layer of a roofing system works together to deliver strength, sealing, drainage, and long-term durability. Ice and water shields protect vulnerable areas, underlayment backs up shingles, and starter strips and fasteners secure the assembly against wind and weather. Vapor barriers control interior moisture, while gutters and downspouts direct water safely away from your home. When supported by regular inspections and planned maintenance pathways, your roof becomes a fully integrated shield against Michigan’s changing climate.
If you’re looking to ensure your roof performs at its best, trust the professionals at Roofing Sterling Heights MI. Whether you need a full roof replacement, expert roof inspection, or help choosing the right material—such as asphalt shingles, metal roofing, or flat roofing—our experienced team has you covered.
Ready to protect your home with a dependable, high-quality roofing system? Get started today—contact Roofing Sterling Heights MI for a free estimate and discover why local homeowners trust us for reliable craftsmanship and long-lasting results.