
You’re taking on a roofing installation project, so you’ll need to prepare your site, remove the old roof safely, and inspect the deck for damage. You’ll choose materials, install underlayment and shingles, and guarantee proper flashing and ventilation. As you start this process, you’ll want to avoid common mistakes – and by continuing, you’ll find out how to get a quality job with a good warranty.
Key Takeaways
- Prepare the site by clearing debris and securing the area.
- Remove the old roof carefully to avoid accidents.
- Inspect the roof deck for damage and weak spots.
- Install underlayment and shingles according to manufacturer’s instructions.
- Ensure proper flashing and ventilation for a secure roof.
Learn Roofing Installation Basics
You’re about to plunge into the world of roofing installation, so let’s start with the basics.
You’ll need to understand roofing safety to avoid accidents and guarantee a successful project. This includes wearing proper gear and being mindful of your surroundings.
When it comes to installation tools, you’ll need a variety of equipment such as hammers, tape measures, and ladders. You should also invest in a good roofing knife and a utility knife for cutting materials.
It’s crucial to choose the right tools for the job to ensure efficiency and accuracy.
By prioritizing roofing safety and using the right installation tools, you’ll be well-prepared to tackle your roofing project.
Remember to always follow safety guidelines and use your tools correctly to achieve professional-looking results.
Prepare Your Site For Roofing Work
Before starting your roofing project, it’s essential that you prepare your site for the work ahead, as this will help prevent accidents and guarantee a smooth installation process.
You’re responsible for ensuring site safety, so clear the area around your home of debris, furniture, and other obstacles.
Clear the area around your home of debris and obstacles to ensure site safety.
Check the weather forecast and consider weather conditions that may impact your project, such as strong winds or heavy rain.
Take necessary precautions to secure your site, covering plants and outdoor items to prevent damage.
You should also inform your neighbors about the upcoming work to minimize disruptions.
By preparing your site and considering weather conditions, you’ll be able to focus on the installation process, ensuring a successful and accident-free project.
This preparation is vital for a safe and efficient roofing installation.
Remove Your Old Roof Safely
You’ll start by removing your old roof, which is an essential step in the installation process.
As you remove it, you’ll check for damage to guarantee you don’t miss any potential issues that need fixing.
You’ll also clear debris from the area, making it safer and easier for you to work on installing your new roof.
Remove Old
Removing your old roof is an essential step that requires careful planning and execution. You’ll need to gather necessary roofing tools, such as hammers and pry bars, to remove the old roofing materials.
Don’t forget to wear safety equipment, including gloves and a hard hat, to protect yourself from potential hazards.
As you start removing the old roof, you’ll need to be mindful of your surroundings and work carefully to avoid accidents.
With the right tools and safety equipment, you can safely remove your old roof and prepare it for the new installation.
You’re one step closer to a new roof.
Check Damage
Inspecting your roof’s underlying structure is essential as you remove your old roof.
You’re doing a roof inspection to identify potential issues.
Now, it’s time for damage assessment.
- Rotting wood
- Leaks
- Cracks
Clear Debris
Tearing off your old roof is an essential step, and it requires careful planning to do it safely.
You’ll encounter various debris types, including old shingles, nails, and roofing felt. For safe debris removal, you’ll need to sort and dispose of these materials properly.
You’re responsible for making certain the area is clear of hazards before proceeding with the installation. Remove all debris to prevent accidents and guarantee a smooth installation process.
Proper debris removal will also help you identify any potential issues with your roof’s structure, allowing you to address them before installing the new roof, saving you time and money.
Inspect Your Roof Deck For Damage
You’ll typically start by checking your roof deck for any signs of damage, as it’s essential to guarantee it’s sturdy enough to support the new roofing materials.
This roof inspection and deck assessment will help you identify potential issues. During the inspection, look for:
- Weak or rotten wood
- Cracks and gaps
- Water damage or stains
- Loose or missing screws
- Sagging or uneven areas
You’re ensuring a solid foundation for your new roof, and it’s important to get it right.
A thorough inspection will save you time and money in the long run, and give you peace of mind knowing your roof is secure.
Choose The Right Materials For Roofing Installation
With a solid roof deck in place, it’s time to select the materials that’ll make up your new roof. You’re choosing roofing materials that’ll protect your home from elements, so consider material durability.
Different materials offer varying levels of durability, and you should pick ones that can withstand your area’s weather conditions. You’ll want to think about the climate, weather patterns, and potential hazards when selecting materials.
Choose materials that withstand your area’s weather conditions and potential hazards for optimal durability.
Consider factors like weight, maintenance, and cost. By choosing the right roofing materials, you’ll guarantee your roof lasts for years to come.
Research and compare different options to find the best fit for your home and budget. This will help you make an informed decision and get the most out of your new roof.
Roofing Styles To Consider
You’re now considering the style of your roof, and you’ve got a few options to think about.
If you don’t want a steeply pitched roof, you can opt for flat roofs, which are great for certain types of buildings.
You’re also looking at slate tiles, a popular choice that’s both durable and attractive, and it’s worth weighing the pros and cons of each.
Flat Roofs
Flat roofs are a popular choice for many buildings, particularly those in urban areas or with modern architectural designs.
You’ll find flat roof advantages, such as easier maintenance and repair, make them a great option.
When considering a flat roof, you should think about:
- Ease of installation
- Energy efficiency
- Cost savings
- Durability
- Accessibility for flat roof maintenance.
You can enjoy these benefits while minimizing the need for frequent repairs.
Slate Tiles
Several benefits make slate tiles a top choice among roofing styles.
You’ll appreciate slate durability, which can last for decades with proper care. When considering slate tiles, you’re investing in a long-lasting option.
To guarantee a successful installation, follow key installation tips, such as securing tiles properly and using compatible materials.
You’ll want to work with an experienced installer who’s familiar with slate tiles. By doing so, you’ll maximize the benefits of slate durability and enjoy a roof that withstands the elements.
This will give you peace of mind and protect your home for years to come, making slate tiles a great choice.
What To Expect From A Roofing Inspection?
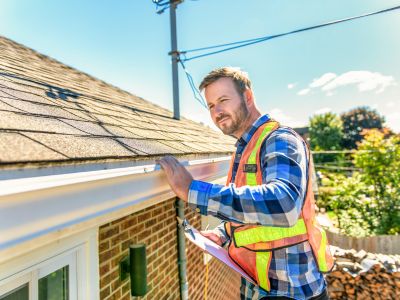
When scheduling a roofing inspection, how thoroughly will it be conducted? You’ll want to know what to expect. A detailed inspection will cover all aspects of your roof.
- Common roofing issues like damaged shingles or leaks will be identified.
- A roofing inspection checklist will be used to guarantee nothing is missed.
- You’ll get a detailed report of any problems found.
- Recommendations for repairs or replacement will be provided.
- You’ll have a clear understanding of the condition of your roof, allowing you to plan and budget accordingly.
Knowing what to expect from a roofing inspection helps you prepare for the process and understand the importance of a thorough roofing inspection checklist in identifying common roofing issues.
Measure And Calculate Your Roofing Requirements
You’ll need to calculate your roof’s size to determine the materials you’ll need, and it’s essential to get this measurement right.
To do this, you’re measuring the length and width of each section of your roof, then adding them together to get the total square footage.
You’re also calculating the cost of materials, which will depend on the type and quality of roofing you’ve chosen, so you can factor this into your overall budget.
Roof Size
To accurately determine your roofing requirements, first measure your roof’s size.
Consider your roof’s pitch and insulation options.
- Calculate the area of each section
- Measure the length and width
- Note the number of valleys and hips
- Identify any skylights or vents
- Record the roof’s complexity to guarantee accurate calculations.
Material Cost
Knowing your roof’s size is just the first step – now it’s time to calculate the material costs.
You’re determining how much material you need, which affects your budget. Consider material selection, as it greatly impacts pricing trends. Different materials have varying costs, so you must choose wisely.
Research current pricing trends to guarantee you’re getting the best deal. Calculate the total cost of materials, including underlayment, shingles, and flashing.
This will give you an accurate estimate of what you’ll spend on your new roof. You’ll be able to plan and budget accordingly, making the installation process smoother.
Install Roofing Underlayment And Felt Paper
Installing roofing underlayment and felt paper is an important step that protects your roof from weathering and potential damage.
You’ll need to choose from various underlayment types, considering factors like durability and cost. When it comes to installation techniques, it’s vital to get it right.
- You guarantee a watertight seal
- Prevent costly repairs
- Reduce the risk of mold and mildew
- Protect your home’s structural integrity
- Increase your roof’s lifespan.
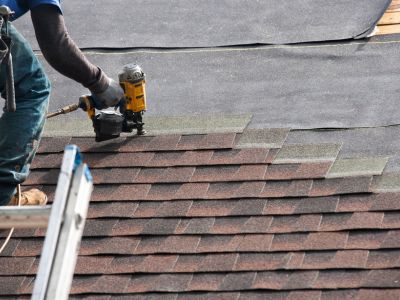
Assemble And Install Roofing Shingles
You’ve secured your roof with underlayment and felt paper, now it’s time to add the finishing touch: roofing shingles.
You’ll choose from various shingle types, including asphalt, metal, and clay. Select the ones that suit your climate, budget, and style.
To install them, you’ll need essential installation tools like a hammer, utility knife, and roofing nails.
Begin by installing the starter shingles along the roof’s edge, then proceed with the main shingles, overlapping each row for a secure fit. Confirm proper spacing and alignment to prevent water seepage.
Use your installation tools to secure the shingles firmly, following the manufacturer’s instructions for the specific shingle type you’ve chosen.
With the right tools and techniques, you’ll complete the assembly and installation of your roofing shingles efficiently.
Flashing And Ventilation In Roofing
You’re now focusing on flashing and ventilation in your roofing installation, and it’s time to contemplate flashing installation around chimneys, vents, and skylights.
You’ll need to guarantee flashing is properly installed to prevent water from seeping into your home.
As you work on flashing, you’ll also install vent pipes to provide airflow and help regulate your home’s temperature and moisture levels.
Flashing Installation
Flashing installation is a critical step in the roofing process that requires attention to detail, as it helps prevent water from seeping into your home.
You’ll choose from various flashing types and flashing materials. Consider the following:
- Durable materials like aluminum or steel
- Waterproof flashing types for valleys
- Compatible materials with your roof
- Properly sealed flashing edges
- Regular maintenance checks, you guarantee a secure roof.
Vent Pipe
With flashing installation complete, it’s time to turn your attention to vent pipes, which play an essential role in your roof’s ventilation system.
You’ll focus on vent pipe installation, ensuring it’s done correctly. Proper vent pipe installation helps regulate temperature and moisture.
You should also consider vent pipe maintenance to prevent damage and clogs. Regular checks will help you identify issues before they become major problems.
By prioritizing vent pipe installation and maintenance, you’ll create a well-ventilated roof that lasts longer and performs better. This step is vital for a durable and efficient roofing system.
You’re one step closer to completing your roof’s ventilation system.
Top 5 Roofing Installation Mistakes And How To Avoid Them
As you prepare to install a new roof, it’s essential that you’re aware of the common pitfalls that can lead to costly repairs or even compromise the structural integrity of your building.
You must prioritize roofing safety and use the right installation tools to avoid mistakes.
- Incorrect measurement of roofing materials
- Insufficient insulation
- Poor ventilation
- Inadequate flashing
- Improper fastening of shingles, which can lead to leaks and damage.
Should You Hire A Professional For Your Roofing Installation?
How much time and money are you willing to invest in your roofing installation?
You’re considering whether to hire a professional or do it yourself. When it comes to roofing safety, it’s essential to prioritize expertise. A professional roofer has the training and experience to guarantee a safe installation.
Conducting a cost analysis will help you determine if hiring a pro fits your budget. While DIY may seem cheaper upfront, it can lead to costly mistakes and compromised roofing safety.
A professional will get the job done efficiently, saving you time and potential repairs down the line. Weighing the costs and benefits, you’ll likely find that hiring a professional is the best choice for a successful, safe, and cost-effective roofing installation.
Get A Quality Roofing Job With A Good Warranty
You’ve decided to hire a professional for your roofing installation, and now you’re looking for a quality job that’ll last. You want to make sure you’re protected in case something goes wrong. That’s where warranty options and installation guarantees come in. These provide peace of mind, knowing you’re covered if issues arise.
Consider the following:
- Material defects are covered
- Workmanship is guaranteed
- You’re protected from roof leaks
- Installation guarantees are included
- Warranty options are flexible and customizable.
With a good warranty, you can trust your roof will be installed correctly and last for years to come. Research and discuss warranty options with your contractor to find the best fit for your needs.
Frequently Asked Questions
Can I Use Multiple Roofing Materials Together?
You can use multiple roofing materials together, considering roofing compatibility and material durability, to create a unique look, but you’re ensuring they don’t compromise each other’s longevity or performance.
How Long Does Roofing Installation Typically Take?
You’ll find roofing installation typically takes several days, depending on your roofing timeline and installation factors, such as size and complexity, which you’re considering when planning the project.
Are Roofing Warranties Transferable?
You’ll find that some roofing warranties are transferable, offering coverage under different warranty types, which can impact your warranty coverage when you sell your home, don’t you?
Can I Repair My Roof Myself Safely?
You can’t repair your roof yourself safely without proper roofing safety gear and DIY tools, it’s not recommended, you’re putting yourself at risk of serious injury or even death, don’t attempt it.
Do I Need Permits for Roofing Installation?
You typically need permits for roofing installation, and it’s your responsibility to check local roofing regulations and permit requirements before you start the project, don’t assume they don’t apply.
Final Thoughts
A step-by-step roofing installation only delivers the results you want when every phase is handled correctly—from tear-off and deck inspection to underlayment, starter shingles, main shingle installation, and the final finishing touches. Cutting corners on preparation, fastening, flashing details, or cleanup can lead to premature wear, leaks, and voided warranties. That’s why it’s important to treat the process as a complete system—not just “putting on shingles.”
At Roofing Sterling Heights MI, we follow a proven installation process designed to protect your property and deliver long-lasting workmanship. If you’re planning a new roof or want an expert opinion on your current system, start with a professional roof inspection. When you’re ready, request a free estimate through our contact page and confirm our service area to see where we work.